
ARDUINO

-
 W5100 network ethernet shield ()
The Arduino Ethernet Shield allows an Arduino board to connect to the internet. It is based on the Wiznet W5100 ethernet chip providing a network (IP) stack capable of both TCP and UDP. The Arduino Ethernet Shield supports up to four simultaneous socket connections. Use the Ethernet library to write sketches which connect to the internet via a standard RJ45 Ethernet jack using the shield.
The latest revision of the shield adds a micro-SD card slot, which can be used to store files for serving over the network. It is compatible with the Arduino Uno and Mega (using the Ethernet library). You can access the on-board SD card slot using the SD library which is included in the current Arduino build.
The latest revision of the shield also includes a reset controller, to ensure that the W5100 Ethernet module is properly reset on power-up. Previous revisions of the shield were not compatible with the Mega and need to be manually reset after power-up. The reset button on the shield resets both the W5100 and the Arduino board.
Arduino communicates with both the W5100 and SD card using the SPI bus (through the ICSP header). This is on digital pins 11, 12, and 13 on the Duemilanove and pins 50, 51, and 52 on the Mega. On both boards, pin 10 is used to select the W5100 and pin 4 for the SD card. These pins cannot be used for general i/o. On the Mega, the hardware SS pin, 53, is not used to select either the W5100 or the SD card, but it must be kept as an output or the SPI interface won’t work.
Note that because the W5100 and SD card share the SPI bus, only one can be active at a time. If you are using both peripherals in your program, this should be taken care of by the corresponding libraries. If you’re not using one of the peripherals in your program, however, you’ll need to explicitly deselect it. To do this with the SD card, set pin 4 as an output and write a high to it. For the W5100, set digital pin 10 as a high output.
Add to Cart19.90€ -
 Ethernet Shield ()
The Arduino Ethernet Shield allows an Arduino board to connect to the internet. It is based on the Wiznet W5100 ethernet chip. The Wiznet W5100 provides a network (IP) stack capable of both TCP and UDP. It supports up to four simultaneous socket connections.The ethernet shield connects to an Arduino board using long wire-wrap headers which extend through the shield. This keeps the pin layout intact and allows another shield to be stacked on top.
The R3 version brings to this shield the 1.0 standard pinout that consist in 4 additional pins: 2 of them placed near the AREF pin, that are used for TWI communication, and the other 2 are placed near the RESET pin. The IOREF pin is used to adapt the shield to the board on which is mounted. The last one is not connected and is reserved for future uses.
The latest revision of the shield adds a micro-SD card slot, which can be used to store files for serving over the network. It is compatible with the Arduino Duemilanove and Mega (using the Ethernet library). It also adds a separate power-over-Ethernet (PoE) module can be soldered to the board to provide power from a conventional twisted pair Category 5 Ethernet cable. It is IEEE802.3af compliant, and works with all compliant PoE injectors currently available.
Add to Cart29.00€ -
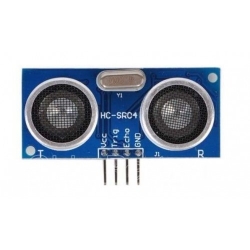 Ultrasonic Distance Sensor ()
ultrasonic sensor provides an easy method of distance measurement. This sensor is perfect for any number of applications that require you to perform measurements between moving or stationary objects.
Interfacing to a microcontroller is a snap. A single I/O pin is used to trigger an ultrasonic burst (well above human hearing) and then "listen" for the echo return pulse. The sensor measures the time required for the echo return, and returns this value to the microcontroller as a variable-width pulse via the same I/O pin.
Application Ideas:
- Security systems
- Interactive animated exhibits
- Parking assistant systems
- Robotic navigation
Add to Cart2.98€ -
 Wireless SD Shield ()
The Wireless SD shield allows an Arduino board to communicate wirelessly using a wireless module. It is based on theXbee modules from Digi, but can use any module with the same footprint. The module can communicate up to 100 feet indoors or 300 feet outdoors (with line-of-sight). It can be used as a serial/usb replacement or you can put it into a command mode and configure it for a variety of broadcast and mesh networking options. The shields breaks out each of the Xbee's pins to a through-hole solder pad.
Included on board is a SD card slot. When using the SD Library to access the card, Pin 4 is CS and cannot be used otherwise. SPI also relies on pins 11, 12, and 13 for communication.
An on-board switch allows the wireless module to communicate with the USB-to-serial converter or with the microntroller.
Add to Cart50.00€ -
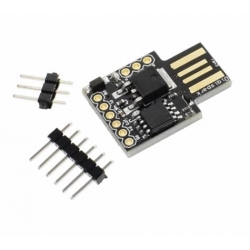 Digispark Kickstarter Development Board ATTINY85 Module for Arduino usb (ATTINY85)Description:
1. Support for the Arduino IDE 1.0 + (OSX/Windows/Linux).
2. Power via USB or External Source or 7-16 v to 5 v (automatic selection).
3. The On - board, 150 ma 5 v Regulator.
4. Built - in USB and serial was debugging).
5. 6 I/O Pins (2 are informs the for USB only if your program actively communicates over USB, otherwise you can use all 6 even if you are programming via USB).
6. 8 k Flash Memory (about 6 k after bootloader).
7. The I2C and SPI (vis USI).
8. PWM on 3 pins (more possible with Software PWM).
9. The ADC on 4 pins.
10. The Power LED and the Test/Status leds.
The Specs:
1. Support for the Arduino IDE 1.0+ (OSX/Win/Linux).
2. Power via USB or External Source - 5v or 7-16v (automatic selection).
3. On-board 150ma 5V Regulator.
4. Built-in USB (and serial debugging).
5. 6 I/O Pins (2 are used for USB only if your program actively communicates over USB, otherwise you can use all 6 even if you are programming via USB).
6. 8k Flash Memory (about 6k after bootloader).
7. I2C and SPI (vis USI).
8. PWM on 3 pins (more possible with Software PWM).
9. ADC on 4 pins.Add to Cart4.17€ -
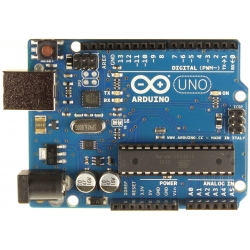 Arduino UNO R3 ( UNO R3)
Microcontroller ATmega328 Operating Voltage 5V Input Voltage (recommended) 7-12V Input Voltage (limits) 6-20V Digital I/O Pins 14 (of which 6 provide PWM output) Analog Input Pins 6 DC Current per I/O Pin 40 mA DC Current for 3.3V Pin 50 mA Flash Memory 32 KB (ATmega328) of which 0.5 KB used by bootloader SRAM 2 KB (ATmega328) EEPROM 1 KB (ATmega328) Clock Speed 16 MHz The power pins are as follows:
- VIN. The input voltage to the Arduino board when it's using an external power source (as opposed to 5 volts from the USB connection or other regulated power source). You can supply voltage through this pin, or, if supplying voltage via the power jack, access it through this pin.
- 5V.This pin outputs a regulated 5V from the regulator on the board. The board can be supplied with power either from the DC power jack (7 - 12V), the USB connector (5V), or the VIN pin of the board (7-12V). Supplying voltage via the 5V or 3.3V pins bypasses the regulator, and can damage your board. We don't advise it.
- 3V3. A 3.3 volt supply generated by the on-board regulator. Maximum current draw is 50 mA.
- GND. Ground pins.
- IOREF. This pin on the Arduino board provides the voltage reference with which the microcontroller operates. A properly configured shield can read the IOREF pin voltage and select the appropriate power source or enable voltage translators on the outputs for working with the 5V or 3.3V.
Add to Cart23.80€ -
 ARDUINO MEGA 2560 (MEGA 2560)he Arduino Mega 2560 is a microcontroller board based on the ATmega2560. It has 54 digital input/output pins (of which 14 can be used as PWM outputs), 16 analog inputs, 4 UARTs (hardware serial ports), a 16 MHz crystal oscillator, a USB connection, a power jack, an ICSP header, and a reset button. It contains everything needed to support the microcontroller; simply connect it to a computer with a USB cable or power it with a AC-to-DC adapter or battery to get started. The Mega is compatible with most shields designed for the Arduino Uno, Duemilanove or Diecimila.Add to Cart46.51€
 -
 The Arduino Starter Kit ()
Here is The Arduino Starter Kit!
This kit walks you through the basics of using the Arduino in a hands-on way. You'll learn through building several creative projects. The kit includes a selection of the most common and useful electronic components with a book of 15 projects. Starting the basics of electronics, to more complex projects, the kit will help you control the physical world with sensor and actuators.
The projects in the kit are:01 GET TO KNOW YOUR TOOLS an introduction to the concepts you'll need to use this kit
02 SPACESHIP INTERFACE design to control panel for your startship
03 LOVE-O-METER measure how hot-blooded you are
04 COLOR MIXING LAMP produce any color with a lamp that uses light as an input
05 MOOD CUE clue people in to how you're doing
06 LIGHT THEREMIN create a musical instrument you play by waving your hands
07 KEYBOARD INSTRUMENT play music and make some noise with this keyboard
08 DIGITAL HOURGLASS a light-up hourglass that can stop you from working too much
09 MOTORIZED PINWHEEL a color wheel that will have your head spinning
10 ZOETROPE create a mechanical animation you can play forward or reverse
11 CRYSTAL BALL a mystical tour to answer all your tough question
12 KNOCK LOCK tap out the secret code to open the door
13 TOUCHY-FEEL LAMP a lamp that responds to your touch
14 TWEAK THE ARDUINO LOGO control your personal computer from your Arduino
15 HACKING BUTTONS create a master control for all your devices!Once you’ve mastered this knowledge, you’ll have a palette of software and circuits that you can use to create something beautiful, and make someone smile with what you invent.
Then build it, hack it and share it. Because Arduino is you!
What in the kit is listed below. Click on the name of the component to download the datasheet of the part. This document will describe the design and functionality of the component.1 Arduino Projects Book (170 pages) 1 Arduino UNO board rev.3 1 USB cable 1 Breadboard 1 Easy-to-assemble wooden base 1 9v battery snap 70 Solid core jumper wires 2 Stranded jumper wires 6 Photoresistor [VT90N2 LDR] 3 Potentiometer 10kilohm 10 Pushbuttons 1 Temperature sensor [TMP36] 1 Tilt sensor 1 alphanumeric LCD (16x2 characters) 1 LED (bright white) 1 LED (RGB) 8 LEDs (red) 8 LEDs (green) 8 LEDs (yellow) 3 LEDs (blue) 1 Small DC motor 6/9V 1 Small servo motor 1 Piezo capsule [PKM17EPP-4001-B0] 1 H-bridge motor driver [L293D] 2 Optocouplers [4N35] 5 Transistor [BC547] 2 Mosfet transistors [IRF520] 5 Capacitors 100nF 3 Capacitors 100uF 5 Capacitor 100pF 5 Diodes [1N4007] 3 Transparent gels (red, green, blue) 1 Male pins strip (40x1) 20 Resistors 220 ohm 5 Resistors 560 ohm 5 Resistors 1 kilohm 5 Resistors 4.7 kilohm 20 Resistors 10 kilohm 5 Resistors 1 megohm 5 Resistors 10 megohm
Add to Cart95.00€